Buffer overflow exploits are commonly found
problems which can cause irrevocable damage to a system if taken advantage of.
The only way to prevent them is to be careful about coding practices and bounds
check to make sure no kind of input, stream, file, command, encryption key, or
otherwise can be used to overwrite a buffer past bounds. The problem with this
is that many libraries, programs, and operating systems used by programmers
already have many of these exploits in them, making prevention difficult if not
impossible.
That being said, here is kind of how it works (all examples run in Windows XP using gdb):
The files used for exploit are named vulnerable_code (courtesy of Dr. Richard Brooks from Clemson University) and they can be found here:
(All code is licensed under the GPL modified license included at the google-code address. It is simply the GPL v3.0 with the modifier that if you enjoyed this and run into me somewhere sometime, you are welcome to buy me a drink).
The link above also includes all the assembly files used to create shellcode, nasm to assemble it, and arwin to find the memory locations. It should have everything you need.
Note: Bear in mind that the memory locations will probably be different for you and you will have to find them yourself (probably by writing AAAA over and over again in memory).
IMPORTANT:
This tutorial is used for explanation and education only. Do not copy my examples and turn them in for a class. You will get caught and get in trouble and you won't learn anything and I will program a helicopter to hunt you down autonomously as revenge.
Exploit 1: Arc Injection
The easiest method of buffer overflow, arc injection, was
the first attempted. VulnerableCode_1.c was used for this for two reasons.
Firstly, because VulnerableCode.c brings a character into an integer array, which
doesn’t allow us to overwrite ¾ of memory. Secondly, because VulnerableCode_2.c
doesn’t flip all the memory into little endian form (which is good for Shellcode
but makes typing words awkward).
The
exploit taken advantage here is two-fold but wouldn’t necessarily have to be
depending on how it was done. First, vulnerable data would have to be
overwritten in order to take advantage of the system function used in the
ArcInjection function. The main function calls the ArcInjection function with
the arguments of a predefined char array named command. This means that the
predefined array is stored somewhere in memory and may be accessible. Using the
gdb debugger, the memory address of command was found to be at 0x22ccf0. If
this string in memory can be changed, the program can be made to run
unauthorized code. Conveniently, the buffer in EnterDataToLocalBuffer is at the
memory address 0x22ce50, which is previous to the command string, meaning it
can be overwritten.
So
to take advantage of this, the command ./VulnerableCode_1 2 ArcInject.txt was
used, with ArcInject.txt being shown in hex below (using a standard hex editor):
The 2 command makes the
EnterVulnerableDataToLocalBuffer run, which has only a buffer of 14 characters.
The above hex overwrites the unimportant data with the letter A (0x41), the
rest of the data is overwritten with what is already there in memory just in
case it is important. This is a precaution that is not necessary if you know
what needs to be reserved. The key points of the hex above are the ESP which
starts at 0x48, the function return value at 0x4C, and the command string at
0xA0. These important parts are overwritten in the memory by being shifted the
correct amount from where the buffer starts, hence the large amount of
arbitrary As.
The
function return pointer, shown in hex at 0x4C and in memory at the shifted
location, is overwritten to 0x004015f9 which is the location of the assembly
instructions in main preceding the arc injection function. This means that when
EnterVulnerableDataToLocalBuffer finishes, it will jump to the ArcInjection
case in main, push the command which is overwritten (to calc in this case) onto
the stack, and then call ArcInjection, forcing the program to run new another
new program. This method is easy to implement and could also be used to inject shellcode
if wanted.
Exploit 2: Recursive Arc Injection
Since
the function RecursivePrefixLocal calls EnterVulnerableDataToLocalBuffer, an
arc injection exploit can be used to recursively run injected code. To keep
things simple, the previous exploit of using the Arc injection to run calc was
used. However, this recursion function could be used to run multiple copies of shellcode
since it calls itself multiple times with data in multiple places in memory. The
command used was: VulnearbleCode_1 3 1 CalcRec.txt with the file used shown
below in hex:
This
is equivalent to the Calc.txt file used in Exploit 1, except that it overwrites
the recursive local variable i to the
value 1 and it overwrites the main recursive variable i to 0, shown above at 0xBC and in memory at 0x22ccec right above
the command character array. This allows the main loop to run multiple times,
each time calling the recursive function, which calls,
EnterVulnerableDataToLocalBuffer, which opens the calculator, resulting in an
infinite loop of calculators.
Exploit 3: Shellcode injection
using Global Data
The
second implementation uses AttackGlobal to overwrite a global buffer much in
the same way as the EnterVulnerableDataToLocalBuffer. However, this
implementation injected shellcode. Creating shellcode is the first step of this
process. In order to create shellcode, the program nasm (included at the link at the top as well) was downloaded to
compile assembly in to a small binary format. The shellcode was written in
assembly in order to keep it as compact as possible. The first shellcode
created generates a messagebox using the Windows user32.dll library and its
assembly instructions are shown in Appendix B. The function called is
MessageBoxA, which is included in the Windows user32.dll library, which is not
necessarily included in the vulnerable code. So the first step of the assembly
is to dynamically load the user32.dll library. This is done by calling the
LoadLibraryA function (which is included in every windows program in
kernel32.dll) with the arguments of the library name, user32.dll, pushed onto
the stack.
Next,
the assembly needs to call GetProcAddress to find the address of a function in
a library, with its arguments, the library to look in, and the function to look
for, pushed on the stack. This function returns the memory address of the
function MessageBoxA. The MessageBoxA function can then be finally called with
its arguments pushed onto the stack. At this point, the code is finished, so it
calls ExitProcess from kernel32.dll with an argument of 0. This is done to
prevent the code from seg-faulting and make it look like the vulnerable code
ended correctly even though it was exploited.
There
are a couple of important factors to include about this type of exploit.
Firstly, nasm is used to compile the assembly with the –f flag into a binary
file with “Bits 32” included in the assembly file. This is important since the
Windows library functions are 32 bit and therefore at 32 bit addresses. Without
this line, the shellcode will load with 24 bit registers and seg-fault. Nextly,
the locations of the Windows functions displayed are different per operating
system and service pack in order to prevent exploits. In order to find the
address of LoadLibraryA, GetProcAddress, and ExitProcess, the code called
arwin.c was used (which is included in the link at top). This code was used as follows ./arwin
kernel32.dll LoadLibraryA in order to find the memory addresses for this
Operating system. If this step is not taken, the shellcode will most likely
seg-fault. This concludes the creation of the shellcode; however, a shortened
version of the assembly is included in the link at top. This version has no conditional jumps and calls MessageBoxA with
its absolute memory address rather than using GetProcAddress.
With
shellcode created, it is just a matter of finding a place to insert it and a
function pointer to overwrite to call it. This is where AttackGlobal comes in.
The GlobalBuf array is located at 0x404108 in memory, which is conveniently
just before the global function pointer variable named FunctPtr, which is
located at 0x404168. So in order to take advantage of this, the shellcode is
inserted into GlobalBuf and then it overwrites the FunctPtr with the starting
memory address of GlobalBuf. This way, when the FunctPtr is called, it goes
instead to the inserted code. VulnerableCode_2.c is used this time instead of
VulnerableCode_1.c because VulnerableCode_1 flips the memory around when
entering the characters. The file used for this (called MessageBox.txt) is
shown below in hex:
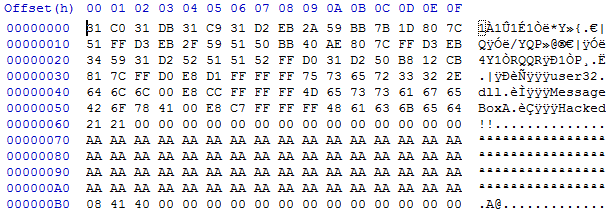
The
shellcode is clearly displayed from 0x00 to 0x63 and then it is null data that
doesn’t matter until the global variable FunctPtr located at 0xB0 in the hex
file and 0x404168 in memory, which we overwrite to 0x404108. The trick, just
like in the first exploit, is to get the shifting right so that the relative
difference is the same and the correct data is overwritten. This way, by
running ./VulnerableCode_2 4 6 MessageBox.txt the code will go into
AttackGlobal because of the 4 argument, overwrite the buffer with shellcode and
overwrite the FunctPtr with the location of the shellcode. Then the code will
return to main and call FunctPtr because of the 6 argument, calling instead the
injected shellcode.
Exploit 4: Another Shellcode
injection using Global Data
In order to show how dangerous shellcode can be, the
methods used in Exploit 3 were used to create another piece of shellcode that
creates a user with administrator privledges on the host computer. This is
dangerous because the username and password are set by the exploit, and the
exploited program shows no indication that it has been exploited. The arwin
function was used to find the memory location of WinExec in kernel32.dll and
run a command to create a user. The assembly instructions for this are included in the link on top. It was run with the command ./ VulnearbleCode_2 4 6
NewUser.txt much like Exploit3 but with a different file generated using nasm
and edited in hex to coincide with the proper memory locations. NewUser.txt is
shown below:
Exploit 5: Recursive Shellcode
injection using Global Data
The RecursivePrefixGlobal function can be taken advantage
of simply because it calls AttackGlobal. Therefore the same arguments and
methods shown in Exploit 3 were used, except that it was run through RecursivePrefixGlobal
with the command VulnearbleCode_2 7 1 6 MessageBox.txt. The local variables
were not overrun in this instance since they were located at a different place
in memory than the global data. However, this could be different if other
global variables were used and is important to keep in mind.
References
**It is
important to note that the examples described in the tutorials above will not
properly work without editing since they are not meant for this specific
environment (and have typos in the assembly instructions). However, they are
very good references for understanding.
Consider donating to further my tinkering.
Places you can find me


