With the introduction of the Raspberry Pi B+, a lot of people are finding image files aren't working unless updated first. Because of this, I went ahead and made a fresh image file for voicecommand on Raspbian that is A/B/B+ compatible.
I've also taken the liberty of putting wiringPi and pilight on it. This means it's easier than ever to control electronics with your voice (I'll post more on that later).
You can read more about it at the hackaday projects page here.
And here is a quick video demo:
Consider donating to further my tinkering since I do all this and help people out for free.
So it's been a little hectic. I moved to San Francisco and mid move, Google decided to deprecate their Speech V1 API. I switched to V2 but did it too quickly and had a lot of problems.
For those of you who haven't seen my voice control software, you can see it in action here and find out how to install it here.
After some investigation, I found that V2 is much, much, much slower over wget and switched to Curl. This should fix all the slow down issues.
I also re-enabled all the languages that Google enables. So now voicecommand again supports over 100 languages [ but not pirate I guess :( ]
You can update with the UpdateAUISuite.sh script in the install folder (run with sudo!)
Sorry this post took so long. I've been busy collaborating on a new app (also it's my Birthday today)
Consider donating to further my tinkering since I do all this and help people out for free.
Places you can find me
Sorry it took so long for this. Google's deprecation of the Speech v1.0 api came at the worst possible time for me as it was right before I started driving across the country.
I didn't get to fix it yesterday when I got into San Francisco either because I ended up going to Maker Faire and then hung out at a bar with all the Hackaday people. I met the guy who invented sudo and figured out I have the same watch as Mike Szczys.
Anyways, I've fixed voicecommand to work again and I fixed a couple of small bugs, including one in the install script which didn't copy the voicecommand config properly.
I have a brand new version of the Raspberry Pi Videolooper that solves a lot of the common issues I'm emailed about. Hopefully this solves problems for a lot of you. You can download the new image here:
For help you can post on the Raspberry Pi subreddit (probably the best way to get fast help)
How to set up the looper
Copy the above image to an SD card following these directions
If you want to use USB, change usb=0 to usb=1 in looperconfig.txt on the SD card (It is in the boot partition which can be read by Windows and Mac).
If you want to disable the looping autostart to make copying files easier, change autostart=1 to autostart=0 in looperconfig.txt
If you aren't using a USB (NTFS) put your video files in the /home/pi/videos directory with SFTP or by turning autostart off. Otherwise, put your video files in a directory named videos on the root directory of your USB.
Set your config options and plug it in!
Features
NEW: Has a config file in the boot directory (looperconfig.txt)
NEW: Has a autostart flag in the config file (autostart=0,autostart=1)
NEW: Has a USB flag in the config file (usb=0,usb=1), just set usb=1, then plug a USB (NTFS) with a videos folder on it and boot.
NEW: Updated all packages (no heartbleed vulnerability, new omxplayer version).
NEW: Only requires 4GB SD card and has a smaller zipped download file.
Supports all raspberry pi video types (mp4,avi,mkv,mp3,mov,mpg,flv,m4v)
Supports subtitles (just put the srt file in the same directory as the videos)
Reduces time between videos
Allows spaces and special characters in the filename
Allows pausing and skipping
Full screen with a black background and no flicker
SSH automatically enabled with user:pi and password:raspberry
Allows easy video conversion using ffmpeg (ffmpeg INFILE -sameq OUTFILE)
Has a default of HDMI audio output with one quick file change (replace -o hdmi with -o local in startvideos.sh).
Can support external HDDs and other directories easily with one quick file change (Change FILES=/home/pi/videos/ to FILES=/YOUR DIRECTORY/ in startvideos.sh)
This is perfect if you are working on a museum or school exhibit. Don't spend a lot of money and energy on a PC running windows and have problems like below (courtesy of the Atlanta Aquarium)!
If you are a museum or other educationally based program and need help, you can post on the Raspberry Pi subreddit (probably the best way to get fast help) or contact me by e-mail at help@stevenhickson.com
Consider donating to further my tinkering since I do all this and help people out for free.
I decided I wanted to make a small game where you were a viking and you threw fireballs at enemy vikings on Unity 3D. The catch is, I wanted to actually throw the fireballs, so I wanted to use the Kinect, and I wanted to actually see if I was the character, so I wanted to use the Oculus Rift.
Here is a quick video of the results before we get on to the discussion:
Basically this started because a colleague at Georgia Tech, Alex Trevor (soon to be Dr,), had an Oculus Rift and mounted a camera on top of it to see the Kinect output with the Oculus Rift. I thought that was really cool and had previously worked on a game that used the Kinect Skeleton to throw fireballs (though I lost all the source code for the first version). I really wanted to combine those ideas and had to start over.
Luckily, Dr. Brian Peasley (now at Microsoft) came to my rescue as always and gifted me an Oculus Rift.
To explain a bit, the Oculus Rift is an immersive virtual reality headset. The two images are displayed on the screen above because one is projected to the left eye and one to the right eye. As you rotate your head, the images change and it feels like you are looking at a real environment (it is pretty amazing). This is why there are two images in the video (and pretty much all Oculus Rift demos). To appreciate it fully, I recommend wearing an Oculus Rift while watching the video.
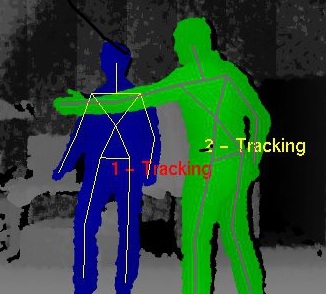
The Kinect everyone should know by now. It can yield a really good skeletal estimation of a person's joints from the depth data, which can then be used to represent gestures.
I had some time this week so I grabbed the Unity third person MMO example, added the Kinect scripts provided by CMU here, created my own fireball and fireball related prefabs and scripts, added the Oculus package, changed all the camera stuff to make it first person, and tweaked a lot of stuff. Daniel Castro (also at Georgia Tech) was nice enough to help me film me making a fool of myself.
It was obviously a bit more complicated than that. Lots of tinkering and scripting was involved to get things working but that is the output. Here at RIM, we are working on lots of other cool things and if you are interested, check out some of my other projects.
I've uploaded the source for public use and you can find it here (just make sure to please cite me):
The fireball script just takes two Game objects (the Viking's left hand normalized by your hip) and uses a velocity measurement to determine if you want to throw the fireball, then it creates a fireball and set's its velocity to your hand's velocity whenever you throw. This can be done easily with a small amount of code as below:
And that's it for the fireball. Then there are some scripts destroying the fireball and vikings when they collide.
For the mapping of the joints to the main Viking, each joint position of the Viking is mapped to the corresponding Kinect Skeleton joints with GameObjects in the KinectControllerScript.
Then the Oculus SDK is used to create the camera and player control mapped to the main viking.
I'm using a friend's version of Unity Pro because I'm a poor graduate student. So please donate if you liked this work so I can continue doing it. All of these gadgets are expensive and I do all this and post it for free.
So please consider donating to further my tinkering!!
Last year I bought an EEG headset (the Mindwave Mobile) to play with my Raspberry Pi and then ended up putting it down for a while. Luckily, this semester I started doing some more machine learning and decided to try it back out. I thought it might be possible to have it recognize when you dislike music and then switch the song on Pandora for you. This would be great for when you are working on something or moving around away from your computer.
So using the EEG headset, a Raspberry Pi, and a bluetooth module, I set to work on recording some data. I listened to a couple songs I liked and then a couple songs I didn't like with labeled data. The Mindwave gives you the delta, theta, high alpha, low alpha, high beta, low beta, high gamma, and mid gamma brainwaves. It also approximates your attention level and meditation level using the FFT (Fast Fourier Transform) and gives you a skin contact signal level (with 0 being the best and 200 being the worst).
Since I know very little about brainwaves, I can't make an educated decision on what changes to look at to detect this; that's where machine learning comes in. I can use Bayesian Estimation to construct two multivariate Gaussian models, one that represents good music and one that represents bad music.
----TECHNICAL DETAILS BELOW----
We construct the model using the parameters below (where μ is the mean of the data and Σ is the standard deviation of the data):
Now that we have the model above for both good music and bad music, we can use a decision boundary to detect what kind of music you are listening to at each data point.
where:
The boundary will be some sort of quadratic (hyper ellipsoid, hyper parabola, etc) and it might look something like below (though ours is a 10 dimensional function):
----END TECHNICAL DETAILS----
The result is an algorithm that is accurate about 70% of the time, which isn't reliable enough. However, since we have temporal data, we can utilize that information, and we wait until we get 4 bad music estimations in a row, then we skip the song.
I've created a short video (don't worry, I skip around so you don't have to watch me listen to music forever) as a proof of concept. Then end result is a way to control what song is playing with only your brainwaves.
This is an extremely experimental system and only works because there are only two classes to choose and it is not even close to good accuracy. I just thought it was cool. I'm curious to see if training using my brainwaves will work for other people as well but I haven't tested it yet. There is a lot still to refine but it's cool to have a proof of concept. You can't buy one of these off the shelf and expect it to change your life. It's uncomfortable and not as accurate as an expensive EEG but it is fun to play with. Now I need to attach one to Google Glass.
NOTE: This was done as a toybox example as fun. You probably aren't going to see EEG controlled headphones in the next couple years. Eventually maybe, but not due to work like this.
I use pianobar to stream Pandora and have a modified version of the control-pianobar.sh control scripts I have put in the github repository below.
I have put the code on Github here but first you need to make sure you have python >= 3.0, bluez, pybluez, and pianobar installed to use it. You will also need to change the home directory information, copy the control-pianobar.sh script to /usr/bin, change the MAC address (mindwaveMobileAddress) in mindwavemobile/MindwaveMobileRawReader.py to the MAC address of your mindwave mobile device (which I got the python code from here), and run sudo python setup.py install.
I start pianobar with control-pianobar.sh p then I start the EEG program with python control_music.py, it will tell you what it thinks the song is in real time and then will skip it if it detects 4 bad signals in a row. It will also tell you whether the headset is on well enough with a low signal warning.
Thanks to Dr. Aaron Bobick (whose pictures and equations I used), robintibor (whose python code I used), and Daniel Castro (who showed me his code for Bayesian Estimation in python since my implementation was in Matlab).
Today I saw another interesting article from the Huffington post that averaged the faces of all the members of congress together. You can find it here.
Unfortunately, its not a good averaging for many reasons I'll state below. So, I created my own, shown here:
I noticed a couple things about the Huffington Post image. It was a really cool idea, but it was extremely blurry so I investigated. It seems the website the creator got the images from has over 800 images for members of the house (I'll let you figure out what is wrong with that). It turns out it had a bunch of copies and black and white images mixed in. Also none of them were aligned. When averaging images, especially facial ones, it is always important to align them.
So I wrote a quick crawler in bash just to get the images from the wikipedia page for congress. Then I wrote some C++ code using OpenCV and my own modification of flandmark[1] to align the facial images. Once aligned, I then averaged them.
You can find the crawler code, the original and aligned images, and the alignment and averaging code on my Github at https://github.com/StevenHickson/AverageFaces. I used CMake, OpenCV, and Boost if you want to test it.
Feel free to use this image as long as you cite this page.
Update:
I was asked who was the closest and furthest away from the mean. The results are as follows:
Closest to the mean (left being the closest):
Stephen Fincher
John Shimkus
Xavier Becerra
....
Furthest from the mean (left being the furthest):
[1] M. Uricar, V. Franc and V. Hlavac, Detector of Facial Landmarks Learned by the Structured Output SVM, VISAPP '12: Proceedings of the 7th International Conference on Computer Vision Theory and Applications, 2012.
I woke up this morning and saw this article detailing Snapchat's new people verification system.
(Credit: Screenshot by Lance Whitney/CNET)
You may have seen it but if not I will summarize it for you. They basically have you choose each image with the Snapchat ghost to prove you are a person. It is kind of like a less annoying captcha.
The problem with this is that the Snapchat ghost is very particular. You could even call it a template. For those of you familiar with template matching (what they are asking you to do to verify your humanity), it is one of the easier tasks in computer vision.
This is an incredibly bad way to verify someone is a person because it is such an easy problem for a computer to solve.
After I read this, I spent around ~30 minutes writing up some code in order to make a computer do this. Now there are many ways of solving this problem, HoG probably would have been best or even color thresholding and PCA for blob recognition but it would take more time and I'm lazy (read: efficient). I ended up using OpenCV and going with simple thresholding, SURF keypoints and FLANN matching with a uniqueness test to determine that multiple keypoints in the training image weren't being singularly matched in the testing image.
First, I extract the different images from the slide above, then I threshold them and the ghost template to find objects that are that color. Next, I extract feature points and descriptors from the test image and the template using SURF and match them using FLANN. I only use the "best" matches using a distance metric and then check all the matches for uniqueness to verify one feature in the template isn't matching most of the test features. If the uniqueness is high enough and enough features are found, we call it a ghost.
With very little effort, my code was able to "find the ghost" in the above example with 100% accuracy. I'm not saying it is perfect, far from it. I'm just saying that if it takes someone less than an hour to train a computer to break an example of your human verification system, you are doing something wrong. There are a ton of ways to do this using computer vision, all of them quick and effiective. It's a numbers game with computers and Snapchat's verification system is losing.