Tuesday, February 18, 2020

Rotatable Screen Mirroring iPhones with a Raspberry Pi and Airplay Clone


Recently, I installed a TV on an articulating mount in the kitchen for both tv and recipes (for those interested, I used this mount).

I wanted to be able to screen mirror my phone for recipes and shows in both landscape and normal orientations. Unfortunately, nothing currently allowed for that.
Luckily I found an excellent open source air play clone called RPiPlay
They didn't yet have rotating functionality but I spent some time implementing it and adding it on my own branch here:

With the code above, rpiplay can be started normally for landscape or rotated with rpiplay -r 90.

I also went ahead and made that code a system service and created a node web button to start the system in rotated or normal display mode so that everything is headless. 

You access the node web button on your phone or computer with http://pi-ip-address:9000/ where there is a button for changing rotation.

Here is a video demonstrating the landscape normal orientation.


And here is another one demonstrating portrait mode with the TV rotated after I've rotated it with the rotate button on my phone.


Install info can be found in the install folder but for ease I have included an image below that is fully set up. Install it just like a normal raspberry pi image. Make sure you expand the filesystem and change the default password (raspberry) as ssh is enabled!


Feel free to contact me for any questions or if you have products or ideas you think I should try. Places you can find me

Consider donating here to support my tinkering habits.


Monday, January 27, 2020

Powering Google Nest Cameras with Power over Ethernet


Recently I embarked on replacing all a friend's old cameras with some Nest cameras. Unfortunately, the cameras they had were wired up with Ethernet wire so that the only wiring available was custom wiring using 12V. I love the Nest Outdoor Cameras but I don't know why they don't have a PoE option. I didn't want to rewire parts of the house nor have the unsightly nest power cord.

I decided to make my own and figured I would share the details for others who want to avoid the  power cord (Note: This will probably void your nest cam warranty).


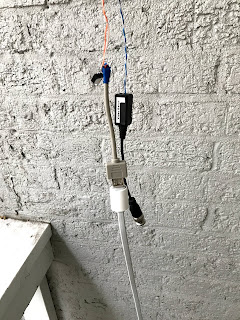
Above is what the original camera wiring looked like. Two wires for power (12V) and two for data.

You might think, okay just change the power supply on the other side to 5V and call it a day. Unfortunately, Ethernet wire doesn't support 5V very well. When a load is applied (1.5A for the Nest) over a distance, the voltage drops and the nest cam doesn't work.

So, at first, I figured, let's just throw a voltage regulator on there and it should be fine (I used a LM7805). This is shown below. However, this was getting pretty hot and I was worried about it not lasting for several years.

I ended up finding the perfect circuit for this on Amazon here.
It's a LM317 Adjustable Linear Regulator Converter Power Supply with a heat sink and everything you already need. Next, I just rotated the adjustable knob until I read 5V to prep them.
Finally, I got some female USB ports here and soldiered them to the output of the power supply module as shown below.


Then all I had to do was plug the Ethernet wires with the 12V power into the input of each supply, put it in a small enclosure, plug the Nest cam in, and push the Nest cord up into the camera whole.


Here is the final output. A clean nice ethernet based Nest solution. Hopefully Nest comes out with some sort of a PoE solution. However, f you are looking to do this before then, the links above should be all you need to replicate it. This should work for any supply over 9V up to the voltage regulator input limit so you aren't locked in to a 12V only solution like mine.


Feel free to contact me for any questions or if you have products or ideas you think I should try. Places you can find me
Consider donating here to support my tinkering habits.