Thursday, February 20, 2014

Throwing fireballs with the Kinect and Oculus Rift in Unity 3D

I decided I wanted to make a small game where you were a viking and you threw fireballs at enemy vikings on Unity 3D. The catch is, I wanted to actually throw the fireballs, so I wanted to use the Kinect, and I wanted to actually see if I was the character, so I wanted to use the Oculus Rift.

Here is a quick video of the results before we get on to the discussion:


Basically this started because a colleague at Georgia Tech, Alex Trevor (soon to be Dr,), had an Oculus Rift and mounted a camera on top of it to see the Kinect output with the Oculus Rift. I thought that was really cool and had previously worked on a game that used the Kinect Skeleton to throw fireballs (though I lost all the source code for the first version). I really wanted to combine those ideas and had to start over.

Luckily, Dr. Brian Peasley (now at Microsoft) came to my rescue as always and gifted me an Oculus Rift. 


To explain a bit, the Oculus Rift is an immersive virtual reality headset. The two images are displayed on the screen above because one is projected to the left eye and one to the right eye. As you rotate your head, the images change and it feels like you are looking at a real environment (it is pretty amazing). This is why there are two images in the video (and pretty much all Oculus Rift demos). To appreciate it fully, I recommend wearing an Oculus Rift while watching the video.
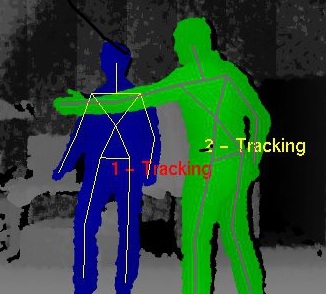


The Kinect everyone should know by now. It can yield a really good skeletal estimation of a person's joints from the depth data, which can then be used to represent gestures.

I had some time this week so I grabbed the Unity third person MMO example, added the Kinect scripts provided by CMU here, created my own fireball and fireball related prefabs and scripts, added the Oculus package, changed all the camera stuff to make it first person, and tweaked a lot of stuff. Daniel Castro (also at Georgia Tech) was nice enough to help me film me making a fool of myself.
It was obviously a bit more complicated than that. Lots of tinkering and scripting was involved to get things working but that is the output. Here at RIM, we are working on lots of other cool things and if you are interested, check out some of my other projects.

I've uploaded the source for public use and you can find it here (just make sure to please cite me):

The fireball script just takes two Game objects (the Viking's left hand normalized by your hip) and uses a velocity measurement to determine if you want to throw the fireball, then it creates a fireball and set's its velocity to your hand's velocity whenever you throw. This can be done easily with a small amount of code as below:
void Update () {
Vector3 norm_hand = HandPosition.transform.position - HipPosition.transform.position;
Vector3 velocity = (norm_hand - lastPos) / Time.deltaTime;
float dist = velocity.magnitude;
if (Input.GetButtonDown("Fire1") || (dist > THRESH && dist < MAX_THRESH)) {
                        Rigidbody clone;
Vector3 pos = HandPosition.transform.position;
pos.z += 1;
                        clone = (Rigidbody)Instantiate(Projectile, pos, transform.rotation);
clone.velocity = velocity * SPEED;
                }
lastPos = norm_hand;
}

And that's it for the fireball. Then there are some scripts destroying the fireball and vikings when they collide.
For the mapping of the joints to the main Viking, each joint position of the Viking is mapped to the corresponding Kinect Skeleton joints with GameObjects in the KinectControllerScript.
Then the Oculus SDK is used to create the camera and player control mapped to the main viking.
For all the code, see the Github project

I'm using a friend's version of Unity Pro because I'm a poor graduate student. So please donate if you liked this work so I can continue doing it. All of these gadgets are expensive and I do all this and post it for free.

So please consider donating to further my tinkering!!


Places you can find me

Thursday, February 6, 2014

Controlling music with your mind

Last year I bought an EEG headset (the Mindwave Mobile) to play with my Raspberry Pi and then ended up putting it down for a while. Luckily, this semester I started doing some more machine learning and decided to try it back out. I thought it might be possible to have it recognize when you dislike music and then switch the song on Pandora for you. This would be great for when you are working on something or moving around away from your computer.

So using the EEG headset, a Raspberry Pi, and a bluetooth module, I set to work on recording some data. I listened to a couple songs I liked and then a couple songs I didn't like with labeled data. The Mindwave gives you the delta, theta, high alpha, low alpha, high beta, low beta, high gamma, and mid gamma brainwaves. It also approximates your attention level and meditation level using the FFT (Fast Fourier Transform) and gives you a skin contact signal level (with 0 being the best and 200 being the worst).

Since I know very little about brainwaves, I can't make an educated decision on what changes to look at to detect this; that's where machine learning comes in. I can use Bayesian Estimation to construct two multivariate Gaussian models, one that represents good music and one that represents bad music.


----TECHNICAL DETAILS BELOW----
We construct the model using the parameters below (where μ is the mean of the data and Σ is the standard deviation of the data):


Now that we have the model above for both good music and bad music, we can use a decision boundary to detect what kind of music you are listening to at each data point.


where:


The boundary will be some sort of quadratic (hyper ellipsoid, hyper parabola, etc) and it might look something like below (though ours is a 10 dimensional function):
 

----END TECHNICAL DETAILS----

The result is an algorithm that is accurate about 70% of the time, which isn't reliable enough. However, since we have temporal data, we can utilize that information, and we wait until we get 4 bad music estimations in a row, then we skip the song.

I've created a short video (don't worry, I skip around so you don't have to watch me listen to music forever) as a proof of concept. Then end result is a way to control what song is playing with only your brainwaves.


This is an extremely experimental system and only works because there are only two classes to choose and it is not even close to good accuracy. I just thought it was cool. I'm curious to see if training using my brainwaves will work for other people as well but I haven't tested it yet. There is a lot still to refine but it's cool to have a proof of concept. You can't buy one of these off the shelf and expect it to change your life. It's uncomfortable and not as accurate as an expensive EEG but it is fun to play with. Now I need to attach one to Google Glass.

NOTE: This was done as a toybox example as fun. You probably aren't going to see EEG controlled headphones in the next couple years. Eventually maybe, but not due to work like this.

How to get it working


HERE IS THE SOURCE CODE

I use pianobar to stream Pandora and have a modified version of the control-pianobar.sh control scripts I have put in the github repository below.
I have put the code on Github here but first you need to make sure you have python >= 3.0, bluez, pybluez, and pianobar installed to use it. You will also need to change the home directory information, copy the control-pianobar.sh script to /usr/bin, change the MAC address (mindwaveMobileAddress) in  mindwavemobile/MindwaveMobileRawReader.py to the MAC address of your mindwave mobile device (which I got the python code from here), and run sudo python setup.py install.

I start pianobar with control-pianobar.sh p then I start the EEG program with python control_music.py, it will tell you what it thinks the song is in real time and then will skip it if it detects 4 bad signals in a row. It will also tell you whether the headset is on well enough with a low signal warning.

Thanks to Dr. Aaron Bobick (whose pictures and equations I used), robintibor (whose python code I used), and Daniel Castro (who showed me his code for Bayesian Estimation in python since my implementation was in Matlab).


Consider donating to further my tinkering.


Places you can find me

Wednesday, January 29, 2014

Averaging Congress Correctly

Today I saw another interesting article from the Huffington post that averaged the faces of all the members of congress together. You can find it here.

Unfortunately, its not a good averaging for many reasons I'll state below. So, I created my own, shown here:

I noticed a couple things about the Huffington Post image. It was a really cool idea, but it was extremely blurry so I investigated. It seems the website the creator got the images from has over 800 images for members of the house (I'll let you figure out what is wrong with that). It turns out it had a bunch of copies and black and white images mixed in. Also none of them were aligned. When averaging images, especially facial ones, it is always important to align them.

So I wrote a quick crawler in bash just to get the images from the wikipedia page for congress. Then I wrote some C++ code using OpenCV and my own modification of flandmark[1] to align the facial images. Once aligned, I then averaged them.

You can find the crawler code, the original and aligned images, and the alignment and averaging code on my Github at https://github.com/StevenHickson/AverageFaces. I used CMake, OpenCV, and Boost if you want to test it.

Feel free to use this image as long as you cite this page.

Update:
I was asked who was the closest and furthest away from the mean. The results are as follows:
Closest to the mean (left being the closest):

Stephen Fincher
John Shimkus
Xavier Becerra


....
Furthest from the mean (left being the furthest):

Terri A. Sewell
Corrine Brown
Betty McCollum

Consider donating to further my tinkering.

Places you can find me

[1] M. Uricar, V. Franc and V. Hlavac, Detector of Facial Landmarks Learned by the Structured Output SVM, VISAPP '12: Proceedings of the 7th International Conference on Computer Vision Theory and Applications, 2012.

Wednesday, January 22, 2014

Hacking Snapchat's people verification in less than 100 lines

I woke up this morning and saw this article detailing Snapchat's new people verification system.

(Credit: Screenshot by Lance Whitney/CNET)
You may have seen it but if not I will summarize it for you. They basically have you choose each image with the Snapchat ghost to prove you are a person. It is kind of like a less annoying captcha.

The problem with this is that the Snapchat ghost is very particular. You could even call it a template. For those of you familiar with template matching (what they are asking you to do to verify your humanity), it is one of the easier tasks in computer vision.

This is an incredibly bad way to verify someone is a person because it is such an easy problem for a computer to solve.

After I read this, I spent around ~30 minutes writing up some code in order to make a computer do this. Now there are many ways of solving this problem, HoG probably would have been best or even color thresholding and PCA for blob recognition but it would take more time and I'm lazy (read: efficient). I ended up using OpenCV and going with simple thresholding, SURF keypoints and FLANN matching with a uniqueness test to determine that multiple keypoints in the training image weren't being singularly matched in the testing image.

First, I extract the different images from the slide above, then I threshold them and the ghost template to find objects that are that color. Next, I extract feature points and descriptors from the test image and the template using SURF and match them using FLANN. I only use the "best" matches using a distance metric and then check all the matches for uniqueness to verify one feature in the template isn't matching most of the test features. If the uniqueness is high enough and enough features are found, we call it a ghost.

With very little effort, my code was able to "find the ghost" in the above example with 100% accuracy. I'm not saying it is perfect, far from it. I'm just saying that if it takes someone less than an hour to train a computer to break an example of your human verification system, you are doing something wrong. There are a ton of ways to do this using computer vision, all of them quick and effiective. It's a numbers game with computers and Snapchat's verification system is losing.

Below is an example of the output of the code:
Found a Ghost!

And you can find the code on my github here: https://github.com/StevenHickson/FindTheGhost


Note: This just relates to Snapchat's new captcha system. The reason they implemented this was because of the past hacks by people who put way more time and thought into a harder problem. They can be found here:
Graham Smith - https://twitter.com/neuegramhttp://neuebits.com/
Adam Caudill - http://adamcaudill.com/2012/12/31/revisiting-snapchat-api-and-security/
Gibson Security - http://gibsonsec.org/

Consider donating to further my tinkering.

Places you can find me

Friday, November 22, 2013

Autonomously Estimating Attractiveness using Computer Vision


How do you go about teaching a computer what is attractive and what is not?

This is a very difficult question I have been thinking about recently.
Do you create a duck face detector and subtract points? Is it a series of features we are looking for (specific hair color, eye color, skin smoothness symmetry).
Would this data come out in some sort of statistical analysis?
I decided to research this further using Eigen Faces and SVMs.

For those of you that don't know about Eigen Faces[1], they are a decomposition of a set of images into eigenvalues (weights) and eigenvectors (eigenfaces). The amazing thing about these is that given a large enough training set, any image of a face can be reconstructed by multiplying a set of weights (eigenvalues) with the eigenvectors (eigenfaces).

Facial recognition simply extracts the eigenvalues from an image and finds the L2 Norm (a distance metric) between it and the weights of the training data set. The closest distance (below a certain threshold) indicates which face it is.

Top 20 Eigen Faces from our data set


Average image from our data set 


The attractiveness of the average of all images is greater than the average of the attractiveness of all images.


We are currenlty using a similar model for detecting attractiveness. Currently we are accurate ~64% of the time; however, that is just using the L2 Norm. The hope is that using an SVM classifier and the weights for all the faces, we will be able to determine the important eigenfaces and their weights for attractiveness and then create a classification system.

If you review the heat-mapped eigenfaces in the first figure, you will notice specific expressions and features that are highlighted. We have 2027 of these eigenfaces and each face can be seen as a weighted combination of these. Our hope is to find the most attractive and unattractive features in the eigenfaces.

I hypothesize that somewhere in their is an eigenface that corresponds to duckface. Think of the utilization of such a thing. Anytime someone uploads a duckface on facebook, it could warn them that they should stop doing that.

Below are our current statistics of the mean and standard deviation of the weight vectors for each level of attractiveness (1 - 5 with 5 being the most attractive). We have also included a close view of the first 50 weights and a histogram of the weights.


Histogram


It seems there are some very interesting differences in the mean, standard deviation, and histogram based on the level of attractiveness. However, this may be because we have a different amount of training examples for each level of attractiveness (attractiveness is semi-gaussian).

It will be interesting what more tinkering will yield. We can only hope to find the elusive eigenface corresponding to duck face.

References:
[1] Turk, Matthew A and Pentland, Alex P. Face recognition using eigenfaces.Computer Vision and Pattern Recognition, 1991. Proceedings {CVPR'91.}, {IEEE} Computer Society Conference on 1991

Consider donating to further my tinkering.


Places you can find me

Monday, September 30, 2013

Raspberry Pi Automatic Video Looper


Download the image here:
https://onedrive.live.com/redir?resid=e0f17bd2b1ffe81!411&authkey=!AGW37ozZuaeyjDw&ithint=file%2czip

MIRROR: https://mega.co.nz/#!JBcDxLhQ!z41lixcpCS0-zvF2X9SkX-T98Gj5I4m3QIFjXKiZ5p4

Recently I helped out with an Architecture exhibition where they needed 8 projectors looping videos all at the same time. Deciding they didn't want to pay for 8 computers and pay for the electricity for 8 computers, they contacted me to see if I could help (Pictures to come soon!). They got 8 Raspberry Pis, which together cost less than one PC and use less an energy than one PC. That's over 16 times the cost savings and energy savings.

I found a link that did this here. However, it has a couple big issues. It only supports certain file types, doesn't allow spaces in the files and a couple of other things, the escape key stops the whole loop, and their is a longer delay than I want. It also doesn't have the newest version of omxplayer, which plays subtitles and has other new fixes.

So I started creating my own and my version fixes these problems. So I now have decided to publish my image here.

How to set up the looper

  1. Copy this image to an SD card following these directions
  2. Put your video files in the /home/pi/videos directory
  3. Plug it in

Features

  • Supports all raspberry pi video types (mp4,avi,mkv,mp3,mov,mpg,flv,m4v)
  • Supports subtitles (just put the srt file in the same directory as the videos)
  • Reduces time between videos
  • Allows spaces and special characters in the filename
  • Allows pausing and skipping
  • Full screen with a black background and no flicker
  • SSH automatically enabled with user:pi and password:raspberry
  • Allows easy video conversion using ffmpeg (ffmpeg INFILE -sameq OUTFILE)
  • Has a default of HDMI audio output with one quick file change (replace -o hdmi with -o local in startvideos.sh).
  • Can support external HDDs and other directories easily with one quick file change (Change FILES=/home/pi/videos/ to FILES=/YOUR DIRECTORY/ in startvideos.sh)

Source code

The source code can be found on github here. There are a couple main files listed below:
startvideos.sh
startfullscreen.sh
videoloop

This is perfect if you are working on a museum or school exhibit. Don't spend a lot of money and energy on a PC running windows and have problems like below (courtesy of the Atlanta Aquarium).

If you are a museum or other educationally based program and need help, you can contact me by e-mail at help@stevenhickson.com

Consider donating to further my tinkering since I do all this and help people out for free.

Places you can find me

Monday, September 16, 2013

PiAUISuite Update and Voicecommand v3.1

Voicecommand allows you to control your raspberry pi using only your voice. More information and videos on this can be found on my YouTube channel or the original blog posts.

I've made a couple of key changes and their is a new option for people who want to help with the sox implementation to make the speech recognition more continuous rather than chunk-based.


  • The bug in the voicecommand -s hardware has been fixed.
  • Allows multilingual support with !lang and !language
  • Fixed casing bug when matching multiple variables
  • Install, Uninstall, and Update scripts are now seperated by project. So now if you want to only update youtube, just run UpdateAUISuite.sh youtube
  • tts and tts-nofill have been combined.
  • Moving away from yt.js to browse youtube in the browser. Now adding node.js youtube browsing API. See https://github.com/StevenHickson/RaspberryPiTV
  • Building https://github.com/StevenHickson/RaspberryPiTV to work with voicecommand and adding omxcontrols using https://github.com/StevenHickson/omxplayer_fifo
  • With the above, this allows a control panel that can control videos, play pandora, browse youtube, control music, and run voicecommand. Note that this is in beta and will require a lot of manual installation as their is no installation or readme yet (Hopefully soon to come).
  • Added youtube-dl cron update so that youtube-dl updates automatically every night. Often if someone says the youtube script doesn't work, it is because youtube-dl is out of date and YouTube has updated their security algorithms. Running sudo youtube-dl -U often fixes this problem.
  • Added an option in speech-recog.sh to use sox instead of arecord. Simply uncomment out the sox portion and comment the arecord portion in /usr/bin/speech-recog.sh as below:

sox -r 16000 -t alsa $hardware /dev/shm/out.flac silence 1 0.3 1% 1 0.5 1%
wget -q -U "rate=16000" -O - --post-file /dev/shm/out.flac --header="Content-Type: audio/x-flac; rate=16000" "http://www.google.com/speech-api/v1/recognize?lang=en&client=Mozilla/5.0" | sed -e 's/[{}]/''/g'| awk -v k="text" '{n=split($0,a,","); for (i=1; i<=n; i++) print a[i]; exit }' | awk -F: 'NR==3 { print $3; exit }'
#arecord -D $hardware -f cd -t wav -d $duration -r 16000 | flac - -f --best --sample-rate 16000 -o /dev/shm/out.flac 1>/dev/shm/voice.log 2>/dev/shm/voice.log; wget -O - -o /dev/null --post-file /dev/shm/out.flac --header="Content-Type: audio/x-flac; rate=16000" http://www.google.com/speech-api/v1/recognize?lang="$lang" | sed -e 's/[{}]/''/g'| awk -v k="text" '{n=split($0,a,","); for (i=1; i<=n; i++) print a[i]; exit }' | awk -F: 'NR==3 { print $3; exit }'
rm /dev/shm/out.flac
Please let me know how this works for people so I can debug and get this working permanently.  As always, you can find the install, update, and new YouTube videos at my YouTube channel here:
If you are wondering why I've been so quiet, it's because I moved, started grad school at Georgia Tech, and have been doing a technical review for a computer vision book.
Since I'm a poor graduate student, please support my tinkering:


Places you can find me
Get 10% offsitewide when you shop at
at Yescom USA. Valid until October 2013! Retractable Banner Stand at Yescom USA . Valid until October 2013!